Here are instructions for two ways to relamp a figural light bulb from the archived antique christmas lights web site. A link is posetd elswhere in this board but here are the basic instructions
Joanthan Cassiday
I HAVE SOME BEAUTIFUL OLD FIGURAL LIGHTS, BUT THEY HAVE BURNT OUT. IS THERE ANY WAY TO GET THESE LIGHTS TO SHINE AGAIN? Yes, indeed there is a good method to re-lamp your old figural lights! Chris Cuff shares the instructions with us:
You will need the usual favorite Dremel tool, with the fine cutting discs. (Please use safety glasses!- I have had one of these disks break and throw pieces at me!) You will also need mini 14 volt lamps with wire leads as shown, available from many electronics supply houses for about 75? each. You'll also use 1/4" wooden dowels, cut to desired length- (used for "stand-offs") Now, these lamps are 70ma current draw, so you will need to do a complete set of 8 for proper 120 volt series operation, or run them off a 12 volt transformer in parallel.
To begin, we will need a burned out C6 cone lamp, which you put into a napkin, hold it over the trash can, and squeeze the bulb with a pair of pliers to break the glass. Pick out carefully all the old crumbs of glass and setting compound. Unsolder the old filament wires, and set this base aside to use for your new base. You can try to soak off the old base on the figural if you want-too much trouble for my taste). Now, with the Dremel, cut the base carefully off the figural to be restored. I cut it off halfway down the threads, then with my nippers, "peel" the rest of the brass off. You will see the exhaust tip. Snap it off. Cut the lamp base, in an even circle, with the cutting disk. You will want to leave as much of a collar as you can. Looking at the picture, this is what you want to end up with.
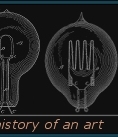
Now, prepare the new lamp bulb as shown. You can choose either of 2 ways to do this- the preferred way is to cut a small piece of wood dowel, drill a hole thru
the center and mount it as shown in the picture at the bottom. The other, less preferred method is to just wire it in without the dowel as shown in the top picture. Using this simpler method allows the bulb to move and the result can be un-even lighting.
Now, solder the bulb's wires, making sure you have no shorts- test it with a
9 volt transistor battery. I find that now, I can simply press the new lamp in, without glue, but you probably should use a bit of silicone caulk to be safe. It will allow the base to be easily removed should you ever need to re-lamp the unit again! The picture here is one of the finished lamps, ready to once again shine on your Christmas tree!
Website visitor Dave Hill recently wrote me with another way to relamp figural Christmas lights. Dave pictures and describes his process below:
I've been collecting light bulbs for 10 years, and have only been on the Internet for a few weeks. After visiting your FAQ page on this site I was amazed to find there was a section on filament replacement and the method that you use. I am writing to you because for many years now I thought I was the only one doing it! How wrong I was!! However, over the years I was forced to make my own method and thought you and others would be interested in how I did it...
I first pried away the bayonet off the bulb. Then, where the glass chamfered down to fit bayonet, I gently rubbed the bulb on a surface of medium fine emery paper until the point where there was a sufficient hole to fit the new bulb.
Then, working on the bayonet, I broke away the base of the electrical connection so there was a hole.
Then, I was struck with the problem of finding a suitable substitute to fit in the base of the bayonet. This took longer than expected but eventually I came up with the perfect item: A good old BIC pen! I found that the stopper in the actual top of the body of the pen, that little black bit, works perfectly!!
So, this brings us to the point of connecting the parts together. In the pen stopper you drill a hole in the side near the ridge, about 1.5mm in size. This is for the side bayonet earth provided by a small brass washer that fits over the shaft of the stopper down to the point where the 1.5mm hole is. Then, drill a hole in the base of the stopper to allow a small brass eyelet for center connection (check photos below).
Now, take the wired bulb replacement and cut one wire at an inch, and the other at 3/4 of an inch. Strip back a very small amount of plastic sheathing off both wires, then push the longest wire through the top of the stopper center hole. Then, solder the wire into the brass eyelet making sure that you keep the plastic stopper away at this point so it does not melt. When cool, fit into the stopper.
The next wire is the tricky one and takes a little bit of dexterity. Push the wire through side hole in the stopper, then slide the washer down stopper to meet it. Now, carefully solder it to washer. This now provides a stable fixture for entry into the bayonet.
At this stage, I would like to add that any Christmas glass shade can be permanently fixed to the bayonet as when new and with this method bulbs can be replaced as and when needed with no major work! -Dave Hill
Dave can be contacted through e-mail at:
thehillsofhollywood@msn.com.